Frequently Asked Questions about Spam Control
Spam Control checks incoming emails for your domain for spam and forwards allowed messages to the respective mailbox. This article contains the most common questions about whitelist, blacklist, filter settings, spam quarantine, reports, attachments, catch-all, and statistics in Spam Control.
Table of Contents
- Whitelisting senders
- Configuring spam protection sensitivity
- Setting up spam reports
- Excluding a mailbox from protection
- Activating global spam quarantine reports
- Blocking defined attachments
- Setting filter rules for the whitelist
- Setting filter rules for the blacklist
- Defining catch-all
- Viewing statistics
- Importing and exporting settings
- General terms
- Additional sections
1. Whitelisting senders
If you add a sender to the whitelist, emails from this sender will be delivered regardless of content. This can be set up for individual senders, entire domains, or specific recipients of your domain.
- Log in to Spam Control.
- Open Incoming – Protection Settings > Whitelist Senders.
- Click Show results to view existing entries.
- Click Add entry to create a new whitelist entry.
- Enter the name of the receiving mailbox without the domain suffix under Local Part.
- Specify under Sender flag which sender information should be checked.
- Save the entry.
The following options are available for Sender flag:
- Apply to envelope sender: checks the technical envelope sender.
- Apply to From: address: checks the visible From address of the email.
- Apply to both: checks both sender information.
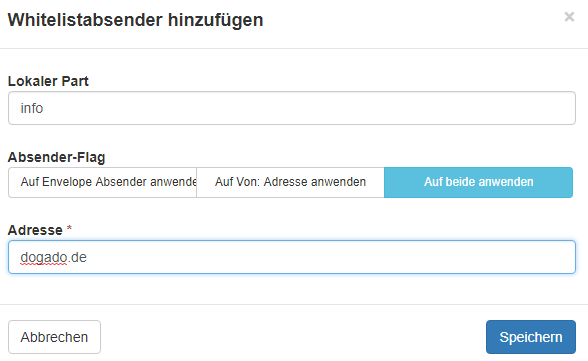
Using the same principle, you can also block senders under Blacklist Senders.
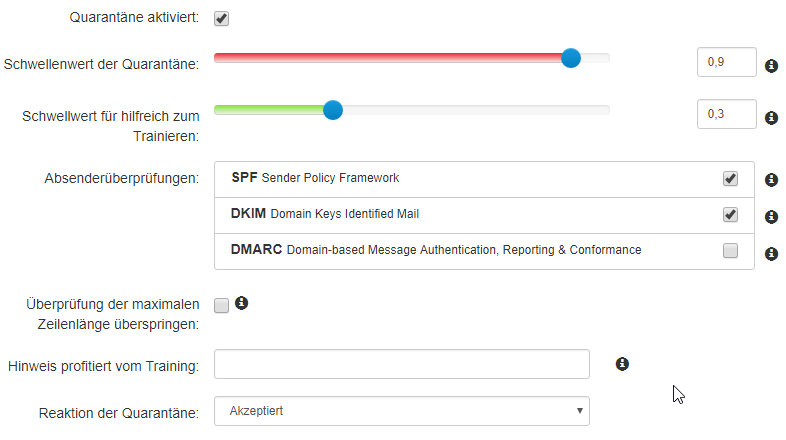
2. Configuring spam protection sensitivity
Under Incoming – Protection Settings > Filter settings, you can set how strictly Spam Control evaluates incoming emails.
With the quarantine threshold, you define when emails are moved to quarantine. The higher the value, the less strict the spam filter operates. The lower the value, the quicker emails are recognized as spam.
3. Setting up spam reports
Under Reporting, you can specify if and how often you want to receive reports about detected spam messages.
You can send reports ad hoc to a desired email address or set up regular reports for the domain. The reports show messages since the last report and, depending on settings, allow further actions for the affected emails.
4. Excluding a mailbox from protection
If a specific mailbox should not be protected by Spam Control, you can exclude this mailbox via the recipient whitelist.
- Log in to Spam Control.
- Open Incoming – Protection Settings > Whitelist Recipients.
- Add the desired recipient.
- Enter only the mailbox name without the domain suffix under Local Part.
- Save the entry.
5. Activating global spam quarantine reports
If all mailboxes should automatically receive a report about the spam quarantine, you can activate reports globally.
- Log in to Spam Control.
- Open Reporting > Protection Report – mailbox.
- Activate automatic activation for all recipients.
- Check the available options for report delivery.
- Save the setting.
Alternatively, you can manually specify the recipients for the reports.
Under Domain report actions, you can configure which actions should be possible from the report. These include, for example, releasing from quarantine, training as spam or non-spam, as well as whitelist and blacklist actions.
6. Blocking defined attachments
Under Incoming – Protection Settings > Restrictions for attachments, you can specify which types of attachments should be blocked.
Selected attachment types will not be allowed by Spam Control.
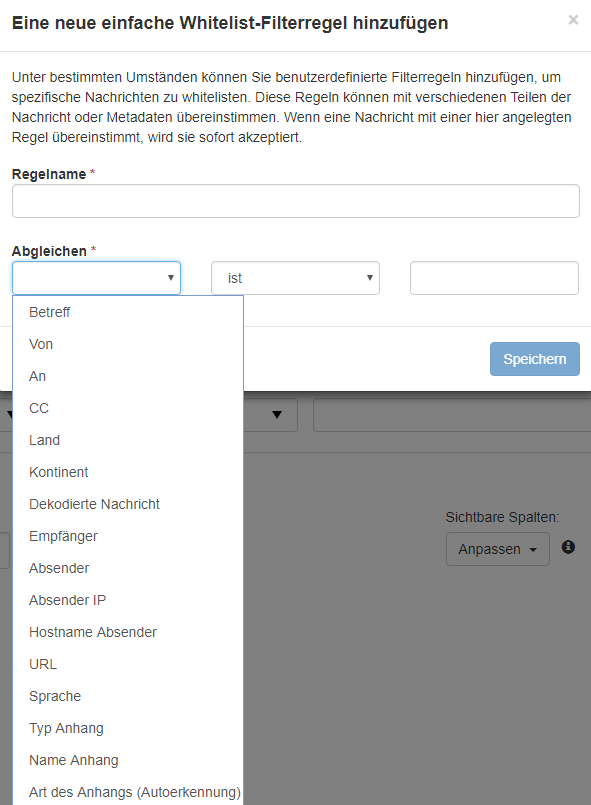
7. Setting filter rules for the whitelist
Under Incoming – Protection Settings > Whitelist filter rules, you can create rules that automatically deliver certain emails.
- Log in to Spam Control.
- Open Incoming – Protection Settings > Whitelist filter rules.
- Click Show results to view existing rules.
- Click Add rule to create a new rule.
- Specify which condition should be checked.
- Save the rule.
If the condition is met, the email will be delivered. For unlocking certain senders, Whitelist Senders is usually recommended.
8. Setting filter rules for the blacklist
Under Incoming – Protection Settings > Blacklist filter rules, you can create rules that block certain emails.
- Log in to Spam Control.
- Open Incoming – Protection Settings > Blacklist filter rules.
- Click Show results to view existing rules.
- Click Add rule to create a new rule.
- Specify which condition should be checked.
- Save the rule.
Blacklist rules are suitable, for example, for distinctive terms in the subject line that do not occur in normal business communication. Very short terms should not be used as they can also appear as part of normal words.
For blocking certain senders, Blacklist Senders is usually recommended.
9. Defining catch-all
If a catch-all configuration is used for your domain, it must be taken into account in Spam Control. Otherwise, emails to recipients unknown to Spam Control may be rejected.
Check the recipient or mailbox configuration in Spam Control and enter the required recipients accordingly.
If you need assistance with the setup, contact support at support@easyname.com.
10. Viewing statistics
Under Incoming > Domain statistics, you can check how many spam messages Spam Control has detected.
You can check specific time periods or retrieve an overall statistic for the domain.
11. Importing and exporting settings
Settings can be imported and exported in Spam Control.
General terms
- *: Placeholder for any number of characters. Example: *@domain.tld stands for all email addresses of this domain.
- Local part: the part of an email address before the @. For support@easyname.com, support is the local part.
Additional sections
| Section | Description |
|---|---|
| Queue for incoming mails | Shows emails that have been temporarily stored and are waiting for delivery. |
| Local recipients | Can be relevant for special recipient or catch-all configurations. Preferably use the mailbox overview. |
| Domain aliases | Allows management of domain forwarding. |
| Aliases for email addresses | Allows management of email forwarding. |
| Train as spam | Here you can import .eml files to train spam detection. |
| Train as not spam | Here you can import .eml files so that similar emails will no longer be recognized as spam in the future. |